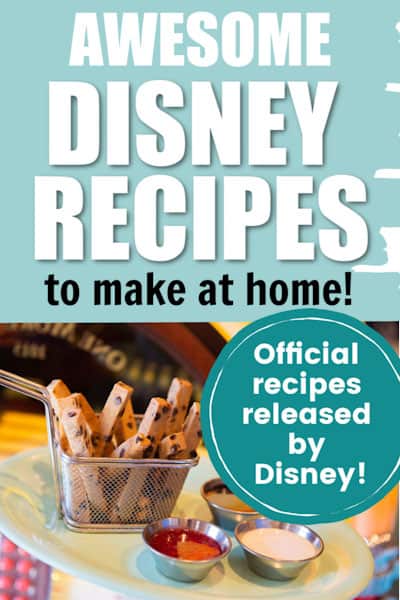
We may earn money or products from the companies mentioned in this post. Please click my disclosure policy to learn more.


Anyone who has gone to Disney World knows how good their food is. But what if you could make some of that food at home? Enter this post on Disney World recipes!
I am writing this post in the midst of the pandemic lock down. One (perhaps the only?) side benefit of the parks being closed is the fact that Disney is trying their hardest to keep us engaged and happy. This led to the release of several OFFICIAL Disney World recipes getting released. That’s right! These aren’t copycat Disney recipes, these are the real deal.
Also, I’m not exactly the world’s greatest cook or baker. I’m not horrible, but I’m not great. Rest assured, these are recipes that normal people can make! You don’t need to be a whiz in the kitchen to make these Disney World recipes.
I have an entire post dedicated to ways you can bring some Disney fun into your home, if you are looking for more ideas!
Disney World Recipes
We’ll start with the “official” Disney World recipes. These are the recipes that Disney themselves have released to the public at various points in time. So far, I’ve made some of these recipes (and plan to make more). I’ll keep updating the ones I’ve made with any tips and comments I’ve come up with. I’ll also make not of any gluten free modifications I’ve tried.
I imagine I’ll eventually add a separate section for other Disney recipes I come across too!
Dole Whip Recipe
The Dole Whip is perhaps one of the most iconic snacks at Disney World. Originally, you could only get it at Aloha Isle in Adventureland at Magic Kingdom, but now it’s spreading to other parks. I mean, have you even been to Disney World if you haven’t eaten a Dole Whip?
So now Disney has released a Dole Whip recipe to the masses. Or as they are calling the recipe: Frozen Pineapple Treat. Probably due to copyright issues with Dole. Disney has even put this recipe on My Disney Experience for everyone to see.
Dole Whip Recipe
Servings: 4
Prep Time: 5 Minutes
Ingredients:
- 1 big scoop of ice cream (presumably vanilla)
- 4 ounces of pineapple juice
- 2 cups of frozen pineapple
Directions:
- Add pineapple, ice cream, and juice to a blender
- Start blending on low speed and increase to high speed. Blend until smooth. Make sure the lid is on tight!
- Use a piping bag with a start tip to create a classic swirl, or just scoop right into bowls. Its pineapple goodness will delight you either way
©️ Disney – My Disney Experience
Don’t get me wrong, I don’t think this is the recipe they use at Disney World. Dole is the actual owner of that recipe so Disney can’t release it without their permission. If you want a more authentic Dole Whip, there’s always this option:


Tips for Making this Dole Whip Recipe
I finally gave this Dole Whip recipe a try tonight. It was quite tasty and gave a good impression of a Dole Whip, but it definitely isn’t the same recipe as in the parks. That being said, it’s still a fun treat to make at home.
I ended up having to add more pineapple juice than the recipe called for. If you do this, make sure you balance it out by addin more ice cream as well. I didn’t add enough extra ice cream when I added more juice. It was still very good, just very pineapple-y. I like more a balance with the creaminess.
If you have one of those diesel blenders, like a Vitamix, you might not have to add extra liquid. My blender is a good one, just not up to Vitamix standards.
Bonus Idea: Make a batch of Dole Whip and watch a video of the Happily Every After fireworks show on YouTube!
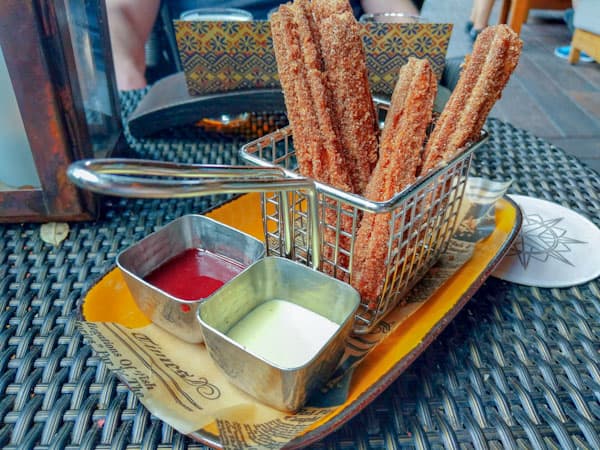
Disney Parks Churro Bites Recipe
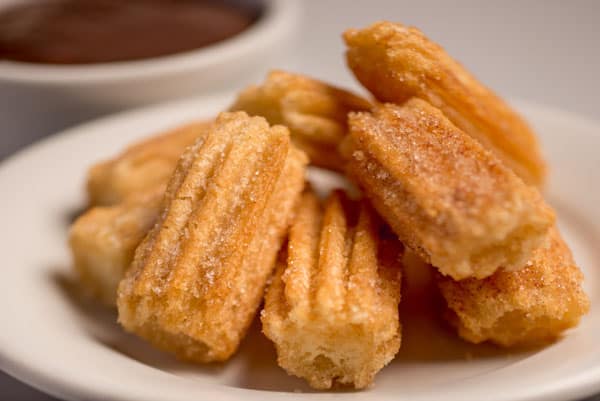
Churros, how much do I love thee? Let me count the ways…So I guess you can tell I like churros. And by like, I mean love. Churros are a very popular snack you can find throughout Disney World. Typically, they are pretty long in size. These Disney Parks churro bites are a more manageable size to make in a home kitchen.
Disney Parks Churro Bites
Servings: 4
Ingredients:
- 1 cup water
- 8 tbsp butter
- 1/4 teaspoon salt
- 3/4 teaspoon ground cinnamon, divided
- 1 1/4 cups all purpose flour
- 3 eggs
- 1 1/2 cups vegetable or canola oil
- 1/2 cup sugar
Directions:
- Combine water, butter, salt, and 1/4 teaspoon cinnamon in 1 1/2 quart saucepan over medium heat. Bring pot to rolling boil.
- Reduce heat to low.
- Add flour and stir vigorously until mix forms a ball. Remove from heat and let rest for 5-7 minutes.
- Add eggs, one at a time, and stir until combined. Set aside.
- Heat oil in medium skillet or 1-quart saucepan over medium high heat or until temperature reaches 350 degrees.
- Spoon dough into piping bag fitted with large star tip. Pipe 1-inch strip of dough over saucepan, cut with knife, and drop into hot oil. Repeat until churro bites fill saucepan with room to fry.
- Fry churro bites until golden brown. Remove with slotted spoon or mesh spider strainer.
- Drain churro bites on paper towel.
- Mix sugar and 1/2 teaspoon cinnamon in medium bowl. Toss in churro bites until coated. Place on serving plate and serve with favorite dipping sauce.
Here is Disney’s post with access to a cute printable of the recipe.
©️ Disney
Disney even released a video showing you how to make the churro bites! Apparently they released this video a couple of years ago, so the churro recipe isn’t exactly new.
Tips for Making Disney Park Churro Bites
For anyone who has read my review of Nomad Lounge, you know I love churros at Disney. Specifically at Nomad Lounge because they are gluten free. This churro bites recipe is very easy to make gluten free. I used Bob’s Red Mill 1 to 1 gluten free flour and the churros turned out great.
A note for gluten free bakers: when you get to the step where you mix in the eggs, you’ll need to get your hands dirty. It just didn’t mix well with a spoon. Once all the eggs are in, use your hands to fully mix the batter.
Personally, I found 1″ to be too small for the bites, so I made them a little longer, closer to 3″ long. I also used my kitchen shears to cut off the dough instead of a knife or spoon. It just seemed easier that way!
And if you don’t have a piping bag with a star tip? No problem! I don’t own piping bags at all, so I used a gallon size freezer bag. Simply spoon the batter into one corner of the freezer bag. Twist the bag directly above the batter and secure with a twist tie. Cut off the tip of the corner of the bag and you are ready to pipe!
I highly recommend making a dipping sauce to go with the churros. We had ours with a peanut butter dipping sauce and it was delicious! Also, these don’t really keep very well, so bring your appetites and eat them all!
Grilled Three Cheese Sandwich from Woody’s Lunch Box
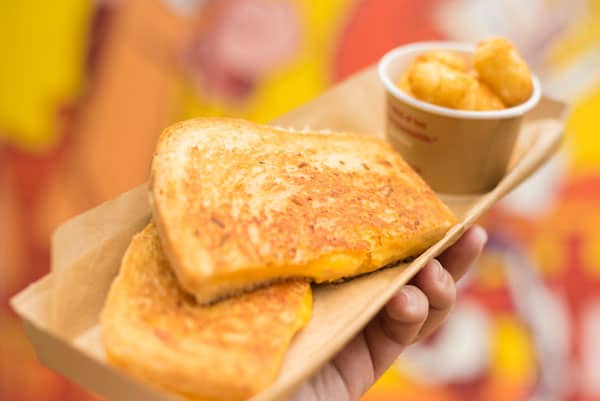
Who loves grilled cheese? I know I certainly do. Woody’s Lunch Box in Hollywood Studios offers a variety of different “grilled cheese” style options.
Disney released the recipe for the Grilled Three-Cheese Sandwich you can get at Woody’s Lunch Box.
Grilled Three-Cheese Sandwich (Woody’s Lunch Box)
Servings: 4
Ingredients:
Cream Cheese Spread:
- 1/2 cup cream cheese
- 1/2 cup shredded Double Gloucester or cheddar
- 2 tbsp heavy cream
- 1/2 tsp coarse salt
Garlic Spread:
- 1 cup mayonnaise
- 1 1/2 tsp minced garlic
- 1/2 tsp coarse salt
Grilled Three-Cheese Sandwich:
- 8 slices of artisan bread
- 8 cheddar cheese slices
- 8 provolone slices
Directions:
For Cream Cheese Spread
Combine cream cheese, Double Gloucester or cheddar, heavy cream, and salt in food processor. Blend until smooth. Set aside.
For Garlic Spread
Combine mayonnaise, garlic, and salt in small bowl and stir until blended. Set aside.
For Grilled Three-Cheese Sandwich
- Lay out artisan bread slices on parchment paper or large cutting board.
- Place 2 slices of cheddar on 4 of the bread slices. Place 2 slices of provolone on remaining bread slices.
- Equally spoon cream cheese spread on slices with provolone. Gently smooth cream cheese spread over each slice.
- Press cheddar side and provolone side together.
- Heat a large skillet over medium heat for 5 minutes, until hot.
- Brush both sides of the sandwiches with garlic spread.
- Grill sandwiches for 2 minutes on each side, until cheese is melted and bread is golden brown.
To see Disney’s post and get a cute printout of the recipe, click here.
©️ Disney
Tips for Making Grilled Three-Cheese Sandwich
I made this recipe the other day, and while it was delicious, it was a bit of a hot mess. So here are some tips that I learned from my experience with it.
First off, I used gluten free bread, which was already a strike against me. Gluten free bread is so much smaller and not the same consistency as normal bread. If you are using real bread, make sure you use a nice big, substantial slice of bread. It will help contain all the yummy goodness.
If you need to use gluten free bread, just embrace the fact that it will be a mess when you eat it. Trust me, it’s still delicious.
Another strike against me was I only needed to make one serving, so I improvised quantities for the cream cheese spread and garlic spread. I used whipped cream cheese and milk instead of heavy cream. The mixture was way too soupy and I think that was part of my problem.
Since the cream cheese I used was whipped, I honestly don’t think it needed any added liquid. If it does, it only needs a splash. The next time I’ll try it with no liquid and see what happens.
In the end, my sandwich certainly didn’t look attractive (and it made a mess of my fingers) but man was it tasty! The flavors in the sandwich are so gosh darn good! I definitely plan to make it again, but I will tweak how I did it. I’ll let you know if I come up with any really good tips. I think people who can eat gluten won’t have some of the issues I did.
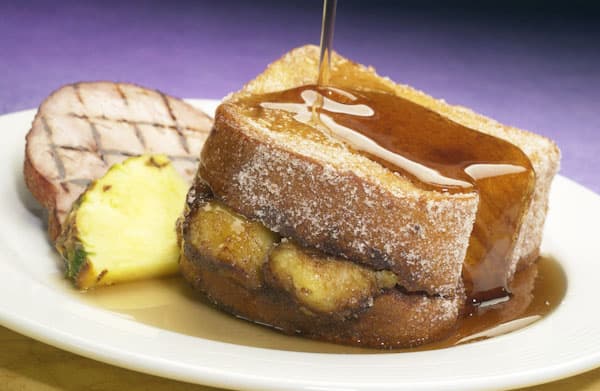
Chocolate, Peanut Butter, Banana French Toast from Disney’s PCH Grill
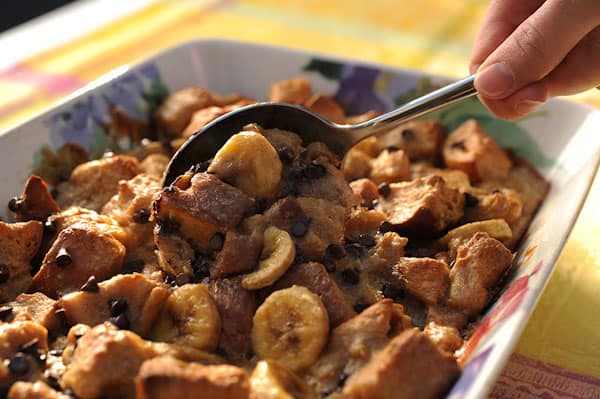
Having never been to Disneyland, I have no direct experience of this meal. Not that I can eat it anyway since it’s essentially a gluten-fest. But man, this recipe makes me wish I could eat gluten! My daughter keeps drooling over it whenever she sees the picture.
This would be a great breakfast to try on a special occasion. Or maybe breakfast for dinner! Really, I don’t think you can go wrong…
Chocolate, Peanut Butter, Banana French Toast (PCH Grill)
Servings: 4
Ingredients:
- 8 thick slices day-old challah bread
- 2 ripe bananas
- 1/4 cup chocolate chips
- 1/2 cup creamy peanut butter
- 6 eggs, lightly beaten
- 3/4 cup low-fat chocolate milk
- 1 teaspoon ground cinnamon
- 1/4 teaspoon salt
- Chocolate syrup and powdered sugar, optional
Directions:
- Preheat oven to 350ºF. Coat a 9x13x2-inch baking pan with nonstick spray. Set aside.
- Cut bread into 1-inch cubes and place in a large bowl. Slice bananas into 1/2-inch slices, and add to bowl. Stir in chocolate chips.
- Combine peanut butter, eggs, chocolate milk, cinnamon, and salt in a blender. Process until smooth.
- Pour egg mixture over bread mixture. Stir gently until bread cubes have absorbed egg mixture.
- Pour mixture into prepared baking pan. Bake for 35 to 40 minutes, or until top is golden brown.
- Before serving, drizzle with chocolate syrup and dust with powdered sugar, if desired.
Here is the link to Disney Parks Blog for the printable recipe!
©️ Disney
If you do want to try a gluten free version of this, perhaps try it with a gluten free french bread or roll. I have used Udi’s gluten free french baguettes in the past to make french toast casseroles.
One thing I have learned when making gluten free french toast is to microwave the bread just before it’s put in the egg mixture. This helps to soften the bread and allows it to absorb the flavor. Otherwise, the bread doesn’t soak up the yummy goodness and is just bread with a coating of batter.
Cookie Fries from Beaches n’ Cream
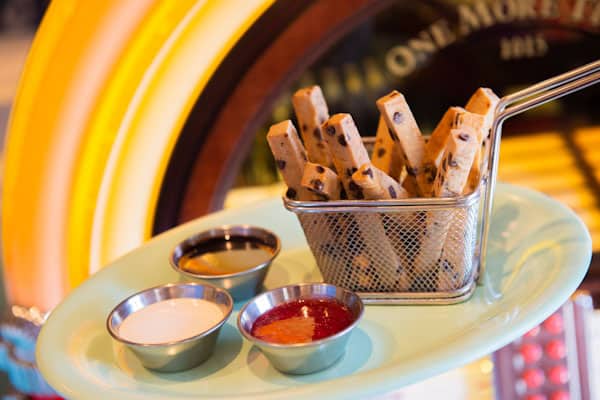
Disney has recently made a big push to offer more vegan options at their restaurants. These Cookie Fries at newly renovated Beaches n’ Cream are just such an example. As someone with special dietary needs myself, I love that Disney goes above and beyond to make us feel special!
Cookie Fries (Beaches n’ Cream)
Servings: 32 Cookie Fries
Ingredients:
- 2 3/4 cup all-purpose flour
- 1/2 cup plus 1 tablespoon powdered sugar
- 1/2 cup plus one tablespoon plant-based margarine, softened
- 7 tablespoons warm water
- 5 tablespoons liquid egg substitute
- 1 tablespoon molasses
- 1/2 cup dairy-free mini chocolate chips
Directions:
- Combine flour, powdered sugar, and plant-based margarine in bowl of electric mixer fitted with paddle attachment. Beat on medium speed until smooth.
- In small bowl, combine warm water and egg substitute. Add egg substitute and molasses to mixer. Mix on medium speed until smooth.
- Fold in chocolate chips.
- Place in an 8×8-inch pan and refrigerate for 30 minutes.
- Preheat oven to 325°F. Line two baking sheets with parchment paper or silicone baking mats.
- Cut into 32 strips that are 1/4-inch wide and 4 inches long. Place 16 strips on each baking sheet.
- Bake for 20-22 minutes, until crunchy.
- Serve with your favorite plant-based chocolate, strawberry, and marshmallow dipping sauces.
Click here to see Disney’s official post of this recipe.
©️ Disney
I haven’t done so yet, but I plan to try making this using dairy, eggs, and gluten free flour. Frankly, it might be a disaster, but I guess I’ll find out. Mainly the gluten free flour will be the disaster, using butter and eggs should be an easy and effective swap.
I love the idea of this recipe and want to see if I can make it more accessible for my family without having to get liquid egg substitute. There is the risk that the gluten free flour is the part that will mess up my entire experiment, but I’m going to give it a go. I’ll report back once I do!
Mickey Mouse Shaped Beignets
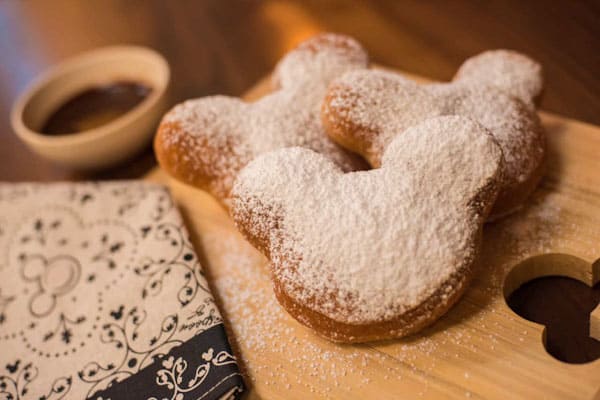
Another serious Disney snack favorite! If you haven’t yet had the beignets over at Port Orleans French Quarter, do yourself a favor and give them a try next time.
For my gluten free readers, the gluten free beignets at Sassagoula Factory and Floatworks at POFQ is on of my top 10 gluten free snacks in all of Disney World.
Mickey Mouse Shaped Beignets
Servings: 10 Large Mickey Shaped Beignets or 2 dozen smaller beignets
Ingredients:
- 1/2 teaspoon dry yeast
- 1/4 cup warm water (105°)
- 1/4 cup sugar
- 2 tablespoons vegetable shortening
- 1/2 teaspoon salt
- 1/2 cup heavy cream
- 1 egg
- 4 cups all-purpose flour
- 1/2 cup boiling water
- Vegetable oil for frying
- Powdered sugar
Directions:
- Sprinkle yeast over warm water in a small bowl, stirring to dissolve. Let stand for 5 minutes.
- Combine sugar, shortening, salt, heavy cream, egg, flour and boiling water in a large bowl; stir in yeast mixture. With the dough hook attachment of an electric mixer on medium speed, mix the dough just until combined and smooth. Let dough rest for 30 minutes.
- Roll to 1/4-inch thickness and cut individual beignets with a Mickey Mouse-shaped cutter or cut into 2 1/2 to 3-inch squares. Cover with a towel and let dough rise until doubled in size in a warm, draft-free area, about 1 to 1 1/2 hours.
- Using caution, heat 3 inches of vegetable oil to 350°F in a deep, heavy pot over medium-high heat. Fry beignets until golden brown, about 2 to 3 minutes, turning as soon as they brown on one side. Remove with tongs and place on paper towels to drain. Dust warm beignets with powdered sugar and serve immediately.
Check out Disney’s original posting to get the printable recipe.
©️ Disney
So, I haven’t made this recipe yet, but I will as soon as I can get my hands on some yeast. Oddly, earlier today my friends and I were texting about how hard it is to find yeast right now, and how I’ve never even used it. Apparently, yeast is a hot item during quarantine!
I plan to try to make this recipe gluten free. I have no idea if it will come out decently, but I’ll let you know. Once I find some yeast, that is. Alternately, once I’ve heard from other people how their gluten free attempts went, I’ll let you know.
Canadian Cheddar Cheese Soup (Le Cellier)

I think people are going to be very excited about this one! In fact, I’m one of them, but for a slightly different reason. The Canadian Cheddar Cheese Soup is a very popular menu item at Le Cellier. It is also typically offered at the Canada kitchen during Epcot’s Food and Wine Festival.
This is the first time that Disney has ever released this particular recipe. I think everyone should try it and tell me how it is in the comments below!
Mine main excitement comes from the fact that I can now make this recipe gluten free and finally give it a try!
Canadian Cheddar Cheese Soup (Le Cellier)
Servings: 10
Ingredients:
- 1/2 pound of bacon, cut into 1/2-inch pieces
- 1 medium red onion, cut into 1/4-inch pieces
- 3 celery ribs, cut into 1/4-inch pieces
- 4 tablespoons butter
- 1 cup all-purpose flour
- 3 cups chicken stock
- 4 cups milk
- 1 pound white cheddar cheese, grated
- 1 tablespoon Tabasco sauce
- 1 tablespoon Worcestershire sauce
- Coarse salt, freshly ground pepper to taste
- 1/2 cup warm Canadian golden lager or any pale lager-style beer
- Chopped scallions or chives, for garnish
Directions:
- In a 4- or 5-quart Dutch oven, cook bacon, stirring, over medium heat for about 5 minutes, or until lightly browned.
- Add red onion, celery, and butter and sauté until onion has softened, about 5 minutes.
- Add flour and cook, stirring constantly, for about 4 minutes over medium heat. Whisk in chicken stock and bring to boil for 1 minute. Reduce heat to simmer and cook for 15 minutes, stirring occasionally.
- Add milk and continue to simmer for 15 minutes. Do not boil after milk is added.
- Remove from heat and add cheese, Tabasco sauce, Worcestershire sauce, salt, and pepper. Blend with immersion blender until cheese is melted and soup is smooth. Stir in warm beer. If the soup is too thick, thin with some warm milk.
- Serve the soup hot, garnished with chopped scallions or chives.
Here is the original posting on Disney Parks Blog to get the recipe print out!
©️ Disney
Tonga Toast (Polynesian Resort)
Disney went ahead and released their recipe for Tonga Toast just in time for a nice Mother’s Day brunch at home! Tonga Toast can be found at Disney World’s Polynesian Resort.
I’m going to need to find some seriously good gluten free bread before I can even begin to contemplate making this one. I don’t think my standard GF bread will cut it. But for the rest of you, please give this recipe a shot and then tell me all about it. I would love to live vicariously through you!
Tonga Toast (Disney’s Polynesian Resort)
Servings: 4
Ingredients:
Sugar Cinnamon
- 3/4 cup granulated sugar
- 2 teaspoons cinnamon
Batter
- 4 large eggs
- 1 1/3 cup whole milk
- 1/4 teaspoon cinnamon
- 1 tablespoon granulated sugar
Tonga Toast
- 1 quart canola oil, for frying
- 1 loaf sourdough bread (uncut, 12 inches long)
- 2 large bananas, peeled
Directions:
For Sugar-Cinnamon:
Mix sugar and cinnamon in medium bowl (large enough to roll toast) with a fork until thoroughly blended. Set aside.
For Batter:
Whip eggs in medium bowl (large enough to dip toast) until well beaten. Add milk, cinnamon, and sugar. Mix well and set aside.
For Tonga Toast:
- Using caution, preheat oil to 350°F in a large pot or a deep fryer. (If using a large pot, use a candy thermometer to make certain the oil does not get any hotter or it will burn.)
- Slice the bread into four three-inch-thick slices.
- Cut each banana in half crosswise, then each piece lengthwise.
- Place a bread slice flat on the counter and tear out just enough from the middle (do not tear all the way through) to stuff half a banana into; repeat with each bread slice.
- Dip stuffed bread into batter, covering both sides, allowing excess batter to drip off bread and place carefully into hot oil.
- Cook 4-5 minutes until golden brown. If needed, turn toast over after 2 minutes and cook for another 2 minutes on other side. Remove and drain excess oil.
- Roll toast in cinnamon-sugar. Repeat for each piece of toast.
As always, you can get a printable of the recipe at Disney Parks Blog.
©️ Disney
There’s even a video to go along with this one to make sure you definitely do everything right! Seriously, can someone please make this and give me all the juicy details?
Grey Stuff (It’s Delicious!) – Be Our Guest
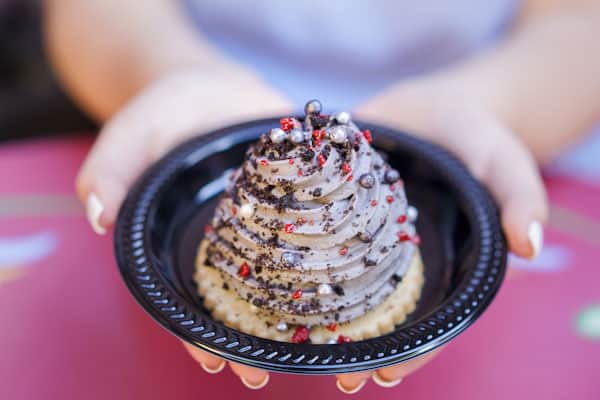
There are some people who make reservations at Be Our Guest restaurant simply to get the Grey Stuff. Good news, now you can make the Grey Stuff at home! And the recipe is super easy.
Grey Stuff (It’s Delicious) – Be Our Guest Restaurant
Servings: 12
Ingredients:
- 1 1/2 cups cold whole milk
- 1 (3.4 ounce) package instant vanilla pudding mix
- 15 chocolate sandwich cookies
- 1 (8 ounce) container whipped topping, thawed
- 3 tablespoons instant chocolate pudding mix
- 12 scalloped sugar cookies
- Edible sugar pearls
Directions:
- Pour milk into large mixing bowl. Add instant vanilla pudding mix and whisk for 2 minutes until smooth and slightly thickened. Place in the refrigerator for 1-2 hours, until firm.
- Place chocolate sandwich cookies in food processor and pulse until puréed.
- Fold puréed cookies into pudding mix. Stir until fully mixed.
- Add whipped topping and instant chocolate pudding. Stir until fully mixed.
- Place in refrigerator and chill for one hour.
- Spoon grey stuff into piping bag fitted with desired tip. Pipe grey stuff onto cookies. Top with sugar pearls.
Get the printable version of this recipe here.
©️ Disney
Let’s be real, you can skip the sugar cookies and the edible pearls if you want to. If you really want, all you need is a spoon to enjoy the Grey Stuff. But there are plenty of other ways you can use the Grey Stuff (it makes a great frosting for cakes and cupcakes).
To make this recipe gluten free, simply substitute the Oreo type cookies for gluten free sandwich cookies. Boom! Gluten free Grey Stuff.
Coincidentally, I made a recipe VERY similar to this as a frosting for my son’s birthday cake the day before Disney released this recipe. And it was delicious, light and not too sweet. The whole family really enjoyed it.
So go ahead! Make the Grey Stuff your new go to frosting!
Peanut Butter & Jelly Milk Shake – 50’s Prime Time Cafe
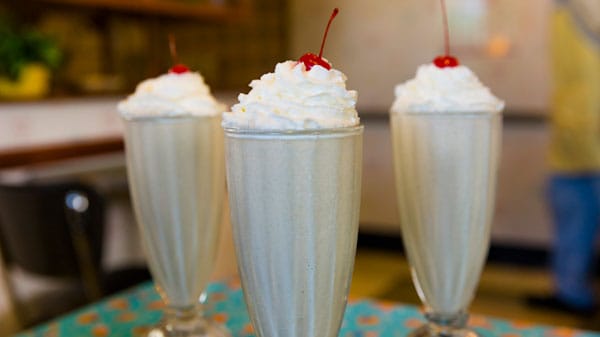
Our first dining experience at 50’s Prime Time was supposed to be in May. Clearly, that trip never happened. But you better believe that this will be on the menu at home.
This might be the single easiest recipe that Disney has released so far.
Peanut Butter & Jelly Milk Shake – 50’s Prime Time Cafe
Servings: 1
Ingredients:
- 2 tablespoons peanut butter
- 2 tablespoons jelly (strawberry or grape)
- 2 cups vanilla ice cream
- 1/4 cup milk
Directions:
- Add all ingredients to blender and blend until smooth.
- Add additional peanut butter or jelly to taste.
Read Disney Parks Blog’s original post about this recipe here.
©️ Disney
My Thoughts on the Peanut Butter and Jelly Milkshake
Seriously, if you don’t have vanilla ice cream in the house (I’m assuming you have milk, peanut butter, and jelly) go get some and make this. Pure deliciousness!
I found the proportions of the ingredients to be spot on. The milkshake blended up really smooth and creamy. I made the recipe as written, which states it is for 1 serving. I split it between two people and found the amounts to be just fine. However, if you have any more than 2 people, double the recipe.
Totchos (Woody’s Lunch Box)
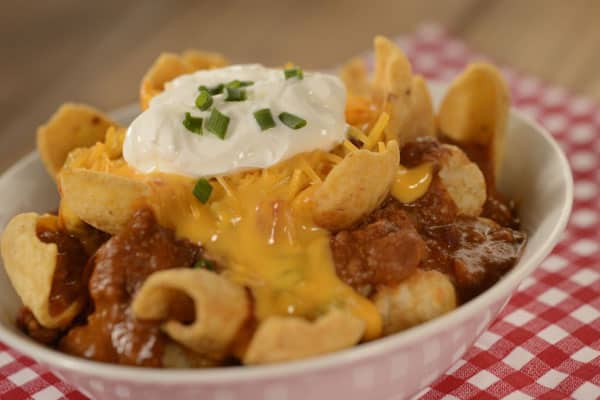
All hail the Totchos! I’m very excited about this recipe as it is my favorite thing to get at Woody’s Lunch Box. What’s not to love about potato barrels and chili? I mean, really!
But hold on to your cowboy hats, because this recipe is a bit more time consuming than most of the others in this post!
Totchos (Woody’s Lunch Box)
Servings: 6
Ingredients:
Chili with Beans
- 1 pound lean ground beef
- 1 medium yellow onion, finely chopped
- 3 cloves garlic, minced
- 1 (14.5 ounce) can crushed tomatoes
- 1 (15 ounce) can tomato sauce
- 1 (15 ounce) can kidney beans, drained
- 2 tablespoons chili powder
- 1 tablespoon ground cumin
- 1 tablespoon coarse salt
- Black pepper, to taste
- Ground cayenne, to taste
Queso Sauce
- 2 cups jar cheese sauce
- 1 (10 ounce) can diced tomatoes with chilies
Totchos
- 1 (2 pound) bag frozen potato barrels
- 1 1/2 cups corn chips
- Chili with Beans
- Queso Sauce
- 3/4 cup shredded cheddar cheese
- 6 tablespoons sour cream
- 2 tablespoons thinly sliced green onions
Directions:
For Chili with Beans:
- Brown ground beef in a 5-6 quart Dutch oven over medium heat until fully cooked. Drain off excess grease.
- Add onion and garlic and sauté for 5-7 minutes, until onion is translucent.
- Add crushed tomatoes, tomato sauce, kidney beans, chili powder, and cumin. Simmer for 20 minutes. Add salt.
- Add black pepper and cayenne, as needed.
- Keep warm until ready to serve.
For Queso Sauce:
- Place cheese sauce and diced tomatoes with chilies in small saucepan. Cook over low heat for 10 minutes, until warm.
- Keep warm until ready to serve.
For Totchos:
- Cook potato barrels according to package instructions.
- Divide potato barrels into 6 bowls. Place 1/4 cup each of corn chips, chili with beans, and queso sauce on top of each bowl of potato barrels.
- Top each bowl with 2 tablespoons shredded cheese, 1 tablespoon sour cream, and 1 teaspoon green onions.
As always, check out the original recipe on Disney Parks Blog.
©️ Disney
I haven’t made this recipe yet, but I fully intend to. It would be great to have before watching any of the Toy Story movies. What a great family movie night idea!
I think my general plan is to make this with leftover chili. We tend to have chili on a fairly regular basis in our house. I think using the leftovers is a great time saver with this recipe.
My Thoughts on the Totchos
This Totcho recipe has now become a staple in my household. I don’t know why, but I think this tastes better than the real deal at Hollywood Studios. My kids get seriously excited when they realize Totchos are on the menu.
I do recommend using this with your family favorite chili recipe. It just makes it a little easier I think. Once the chili is made you now have Totchos for days!
No Bake Granola Treats from Contemporary Resort Bakery
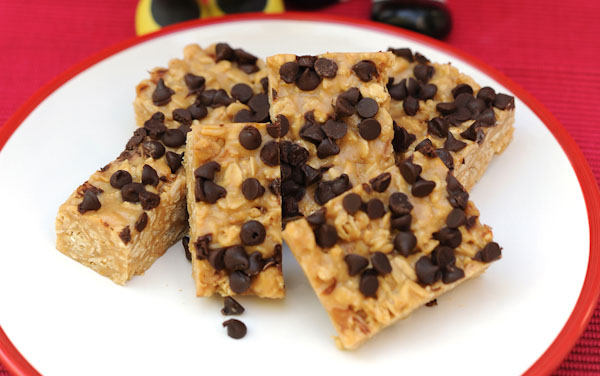
I am all about anything that doesn’t require baking! This recipe is about as simple as it gets and looks pretty darn tasty. My daughter just spotted the picture over my shoulder and now wants to try it!
No Bake Granola Treats from Contemporary Resort Bakery
Servings: 12 2×2 pieces
Ingredients:
- 3 1/2 cups miniature marshmallows
- 2 tablespoons unsalted butter
- 3 tablespoons smooth peanut butter
- 1 1/2 cups granola
- 1/4 cup miniature semisweet chocolate chips
Directions:
- Melt marshmallows and butter in medium saucepan over low heat. Add peanut butter, stirring to combine. Remove from heat. Stir in granola.
- Spoon mixture into 8×8-inch baking dish. Lightly press mixture into pan.
- Sprinkle top of mixture with chocolate chips, lightly pressing the chocolate chips into mixture.
- Set aside at room temperature to cool for 30 minutes. Cut into 12 pieces.
- Store treats in an airtight container at room temperature.
Find the full recipe at Disney Parks Blog.
©️ Disney
S’mores Gelato Shake from D-Luxe Burger
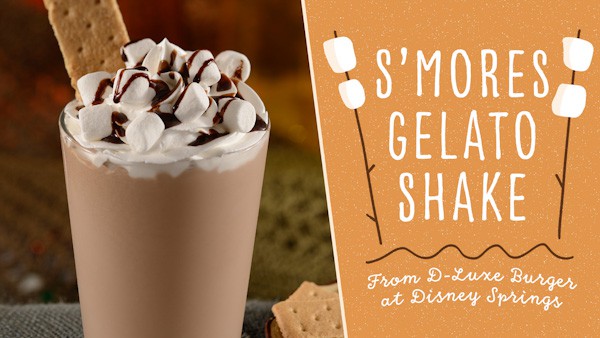
If you haven’t done so already, make sure you check out D-Luxe Burger at Disney Springs during your next trip. It is super delicious in general, but when you add on some of their amazing specialty shakes, the bar is raised.
Lucky for those of us stuck at home, Disney has released the recipe for the amazing S’mores Gelato Shake for us all to enjoy.
S’mores Gelato Shake from D-Luxe Burger
Servings: 1
Ingredients:
- 12 ounces vanilla gelato
- 1/2 ounce dark chocolate sauce
- 1 ounce toasted marshmallow syrup
- 1 tsp crushed graham crackers
- Whipped cream, to garnish
- Mini marshmallows, to garnish
- Graham cracker, to garnish
- Dark chocolate sauce, to garnish
Directions:
Blend vanilla gelato, dark chocolate sauce, toasted marshmallow syrup, and crushed graham crackers until smooth. Serve in tall glass. Garnish with whipped cream, mini marshmallows, graham cracker, and a drizzle of dark chocolate sauce.
Here is Disney’s post with access to a cute printable of the recipe.
©️ Disney
If you can’t find gelato, don’t worry! Just make it with vanilla ice cream instead. You’ll still get the overall flavor, you just won’t have some of the creaminess.
Cliff Dweller Non-Alcoholic Beverage

The recipe for this drink was released in honor of the one year anniversary of Star Wars: Galaxy’s Edge. At both Disney World and Disneyland, this drink can be found at Oga’s Cantina.
Oga’s Cantina is full of delicious (but pricey) beverages, both alcoholic and non-alcoholic.
Cliff Dweller Non-Alcoholic Beverage
Servings: 1
Ingredients:
- 3 oz. orange juice
- 3 oz. pineapple juice
- 1 oz. lime juice
- 1/2 oz. hibiscus grenadine
- 1 oz. cream of coconut
- 1 oz. ginger ale
Directions:
- Combine orange juice, pineapple juice, lime juice, grenadine, and cream of coconut in Boston cocktail shaker with ice.
- Shake well and pour over fresh ice in a tall glass. Top with ginger ale.
Here is Disney’s post with access to a cute printable of the recipe.
©️ Disney
Final Thoughts on Disney World Recipes
This is just the tip of the iceberg when it comes to Disney copy cat recipes. Like I said above, these are recipes which Disney themselves have officially released. I guess that makes these “official” Disney world recipes!
Any of these recipes are a great way to bring a little Disney fun and magic into your home. Sure, there’s no substitute for actually being in Disney, but until we can figure out a way to live there, these recipes will have to do!
Sharing is caring, my friends!
Your Thoughts
What do you think of these Disney World recipes? Do you plan to try them at home? I’d love to hear your results and any tips you have in how best to make them. Put them in the comments below.
Don’t forget to follow The Disney Journey on Pinterest and Facebook to stay up to date with all the latest news and updates.
Kona Wings! must try at home. They are soooo good.
We took our 5yr old niece to Disney and had lunch at Cinderella’s castle. We enjoyed the beef short rib and mashed potatoes and veggies. Even though it was A short rib it was huge and to die for. Wish you could get the recipe
Me too! That sounds delicious! Maybe Disney will be kind to us and let us in on the secret.
I miss home, please say Hi to Mickey and Minnie
We will enjoy these recipes and will be thinking of all of you . As we went through the list we were right back at the Parks eating them .
You should definitely try to make some of them. The Totchos are now in our standard rotation. They make me think of Toy Story Land every time!
I’m just wondering if you have the recipes for the animal kingdom restaurant. I think they were the pann bread and the short ribs and the butter chicken. Thanks so much!
I don’t have those recipes, but I really wish I did!